
 | Plan de ce tutoriel |
Tutoriel vidéo |
Prérequis |
Pour pouvoir intégrer vos commandes Shopify, vous devez nécessairement :
|
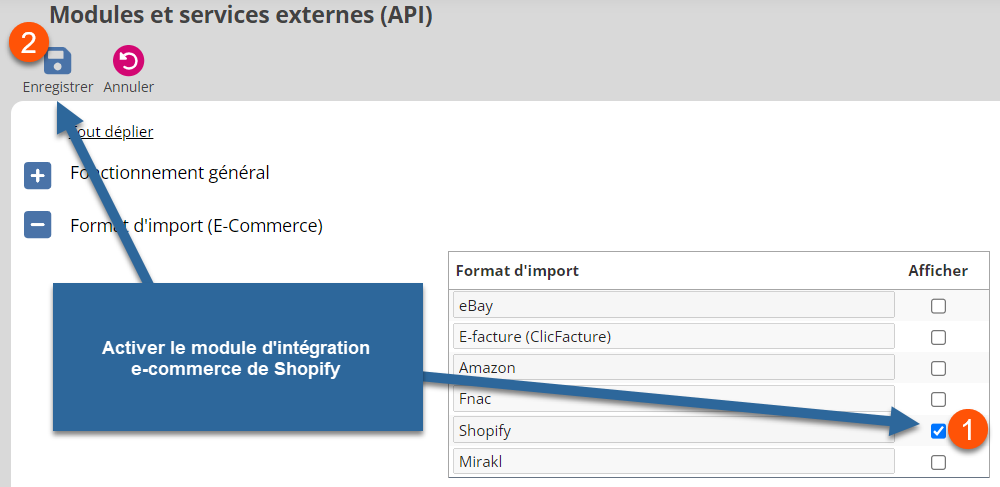 |
Connecter votre boutique |
Vous devez vous connecter à votre boutique et rejoindre Shopify App Store : https://apps.shopify.com/clicfacture :
 |
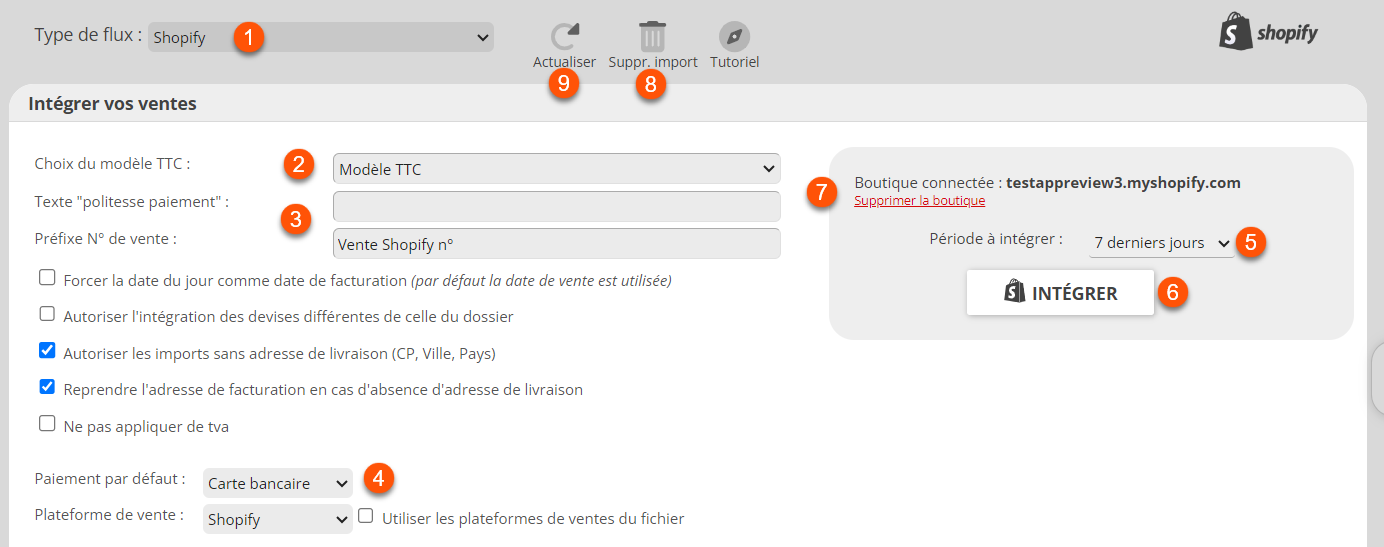
Intégrer vos commandes |
Une fois votre boutique connectée, rejoindre le menu :
NOUVEAU DOC/Intégration e-commerce
 |
|
Grille de contrôle et génération des factures |
En cliquant sur le bouton d’intégration, ClicFacture se connecte à votre boutique et affiche les commandes disponibles sur la période sélectionnée :
 |
|
Supprimer un lot d’intégration |
Comme évoqué précédemment, il est possible de supprimer le ou les derniers lots d’intégration à condition qu’aucune facture ou avoir n’ai été créé de façon manuelle entretemps.
Consulter vos factures et suivre votre activité e-commerce |
Une fois vos factures générées depuis vos commandes Shopify, vous pouvez les consulter depuis la console ClicFacture.
Il est possible d’ouvrir l’accès à votre expert comptable, ou bien lui adresser des rapports mensuels de ventes par exemple pour lui permettre de suivre votre comptabilité :
- Tutoriel : Reporting de TVA et de chiffre d’affaires
- Tutoriel : Statistiques de ventes détaillées
- Tutoriel : Création de plateformes de ventes e-commerce
- Tutoriel : Faire un avoir depuis une facture
- Tutoriel exporter mes factures en lot au format PDF
- Envoyer mes factures par mail en lot


C’est vraiment pratique comme système. Vous pouvez me dire comment télécharger mes factures pour les donner à mon comptable
Merci
Kévin
Bonjour Kévin,
Merci pour votre retour !
Concernant votre Expert-comptable, vous pouvez lui ouvrir directement un accès à votre dossier de facturation, plus besoin de télécharger vos factures ! Vous trouverez la procédure dans le tutoriel suivant : https://www.clicfacture.com/ouverture-acces-expert/
Bonne journée,
Bonjour,
Pourquoi mes factures partiellement remboursées sur shopify ne remontent pas dans clicfacture ?
Comment faire ? Recrééer la facture puis recréer un avoir ?
Bien à vous,
Bonjour,
Difficile de vous répondre sans pus de précisions. Pourriez vous nous adresser une demande via le support (AIDE/Support) ?
D’avance merci.